9.29.2011

DIY Mercury Glass

It's no secret that I have a small obsession with mercury glass.  I have seen many tutorials on how to do it and I finally decided to try it for myself.

The tools:  water in a spray bottle, Krylon looking glass spray paint and a small glass vase


To warn you the spray paint was crazy expensive (at least I thought so).  At Hobby Lobby it was around $11 for the smallest can imaginable but luckily I had my 40% off coupon so I got it for around $6.  Still a lot for spray paint in my opinion but I figured I would give it a try.

I started by turning the vase upside down so I wouldn't get any on the inside.  Then I misted it with the water and then sprayed a light coat of the paint.  I repeated this step one more time and let it dry.

My end result was this


Not as splotchy as I was hoping but overall very pretty.  It looks great with a candle inside too but I couldn't get a very good picture of that, sorry.

After I finished this I had a great I idea of how to use the rest of the paint.  I'll give you a hint: it involves something similar to this

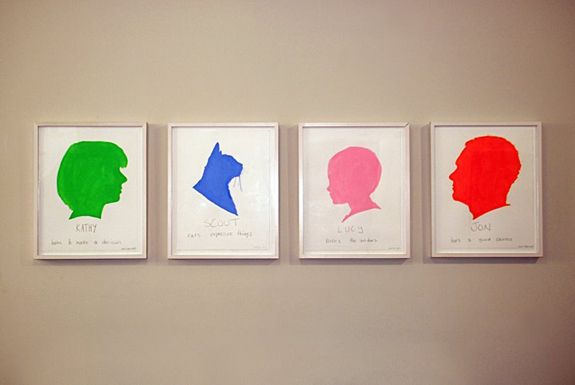
via Little Green Notebook

However, it will be a while before I get to it because the paint works best between temps of 55 and 80 degrees with very low humidity.  So I'm thinking it will be at least Thanksgiving before our weather is like that.

~ Andrea

9.27.2011

5 Weeks and Counting

Because everyone loves to see pregnant women and how cute they are.  Here I am at 34 weeks!


Nothin' but baby!

~ Andrea

9.26.2011

Nesting - Phase 2

My next step in getting the nursery ready was to relocate all of the stuff that was being stored in the room.  To refresh your memory it looked like this


Good storage solutions can work anywhere in your home so I simply moved all of the white shelving into my laundry room.  I had to reconfigure it but all of the pieces fit in the room beautifully and solved my issue of much needed extra storage.


Another issue I was faced with was what to do with all of the coats that were living in the closet in the nursery.  Our house doesn't have a hall/entry closet so I had to get a little creative.  We already have wire shelving over our washer and dryer so I thought I could install something similar behind the door that would serve as our coat storage.


We live in the south so we don't have many big coats but I would like to point out that over half of this rack is filled with my husbands pullover/windbreaker things that are all navy blue with the high school's logo on them (he's an administrator).  They are all different but seriously, how many does one person need?  Oh well, I digress.

Moving all of this stuff also gave me the opportunity to go through everything and get rid of the stuff I really didn't need and reorganize the stuff I did.


I have a craft cabinet, an office cabinet and then all of the open shelves that hold all of the things that we don't use all of the time but still need to hang on to.  Another plus is that all of this new storage freed up shelf space above the washer/dryer so I have some room to expand.


And yes, my laundry room is huge.  It's about the size of a bedroom in most homes and is one of the many reasons I love my house.

~ Andrea

9.13.2011

Reduce, Reuse, Upcycle

My wonderful husband gave me a Kindle for my birthday/our anniversary present back in June.  He also got me a cover like this one.


Well, last month Claire was "reading" my beloved Kindle and was "turning the pages" meaning she turned the Kindle and bent/broke the hooks that kept it attached to the cover.  Luckily it wasn't the kind with the built in light or I would have been really upset.  Instead I set out to find a super cute, less generic cover.

I searched Amazon and Etsy and saw some I liked but wasn't really in love with plus I didn't feel like spending another $30 on a cover.  Then I had the idea to make my own cover.  I mean how hard could it really be?

I used this tutorial from NoodleHead as a starting point and just adjusted it to the size that I needed.  My main concern was that it be durable enough to protect my Kindle.  That's when I had the idea to reuse the broken cover and put it inside my little clutch.  All I had to do was cut out the little prongs, which was a little trickier than I had thought but not impossible.

I followed the clutch tutorial using my own measurements and before I sewed the lining shut I simply put the cover inside and surrounded it with some fluffy fabric for extra cushion and closed up the lining.  When it was finished, I had this,


Best of all the total cost was $0 because I already had all of the stuff.  I love being crafty!

~ Andrea